A/T Transmission Removal
Applies directly to our truck. This is our removal procedure — see Transmission Removal only for reference, that one is the manual-transmission version and does not apply to us.
Preparation
- Raise Vehicle.
- Drain ATF Fluid.
- Remove Driveshaft (Front & Rear).
- Disconnect (-) Battery Cable.
Component removal
- Bell Housing Dust Cover.
- Remove Torque Converter attachment bolts.
- Disconnect Shift Cable.
- Disconnect electrical connectors.
- Remove Oil Filler Tube.
- Remove O-Ring & discard. Replace.
- Disconnect Oil Cooler Pipes. Cap.
- Remove Bracket.
- Remove Starter.
- Place jack in position. Remove Bell Housing attachment bolts.
- Remove Transmission towards rear of vehicle.
- Install in reverse.
Note: Always replace ATF Fluids.
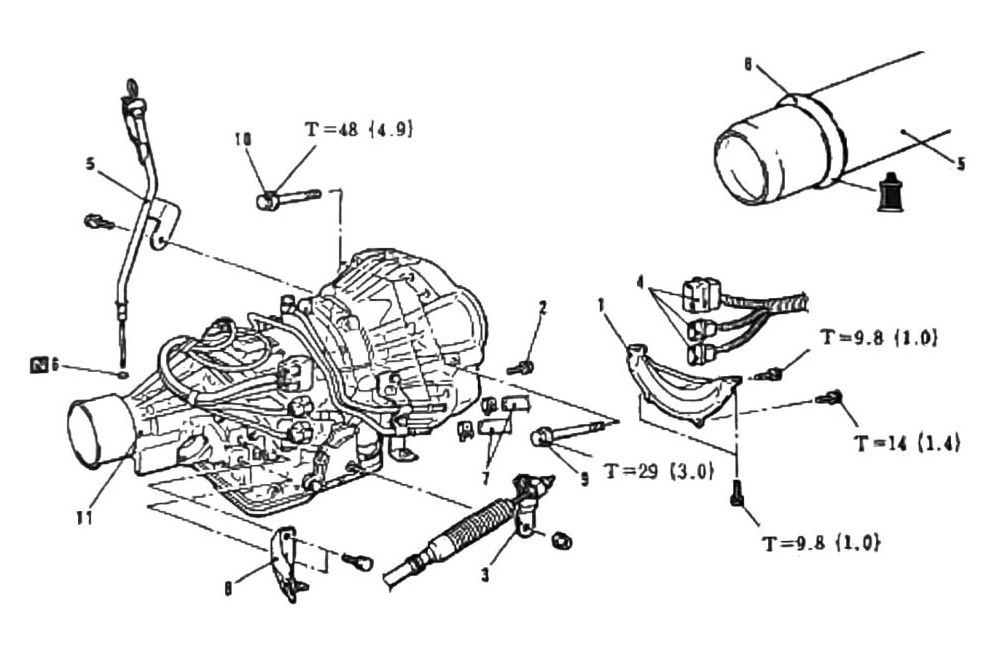
Torque
| Torque callout | N·m (kgf·m) |
|---|---|
| T=48 (35 ft-lb) | (4.9) |
| T=9.8 (87 in-lb) | (1.0) |
| T=29 (21 ft-lb) | (3.0) |
| T=14 (124 in-lb) | (1.4) |
| T=9.8 (87 in-lb) | (1.0) |
(verify printed p.188) — five torque callouts are legible, but the leader lines tying them to specific numbered steps did not survive OCR. Given the parts involved, T=48 (4.9) most likely corresponds to the Torque Converter attachment bolts (step 2, typically a higher-torque joint) and T=9.8 (1.0) most likely corresponds to smaller bracket/starter bolts (steps 8-9) — but this attribution is not confirmed and should not be relied on without checking the printed diagram.