Transfer Case Removal 4WD
Applies directly to our truck — the transfer case is a shared 4WD component independent of whether the main transmission is manual or (as on our truck) the 3A/T.
Preparation
- Remove Front Driveshaft.
- Disconnect Speedometer Cable (4WD).
- Remove Center Exhaust Pipe.
Transfer case removal
The source list mixes sequential removal steps with exploded-diagram component labels; order is preserved as printed.
- Remove Transfer Case Shifter Assembly.
- Remove Cross Member retainer bolts and support case with a jack.
- Washer Cups.
- Spacer — inspect for damage and replace as necessary.
- Mount “A” — replace if cracked or damaged.
- Remove Cross Member and mounting brackets.
- Mount Cushions — inspect for cracking or damage, replace as necessary.
- Transfer Mount Bracket (LH).
- Transfer Mount Bracket (RH).
- Vibration Mounts.
- Remove Transfer Case.
- Inspect Transfer Cross Member.
- Installation in reverse.
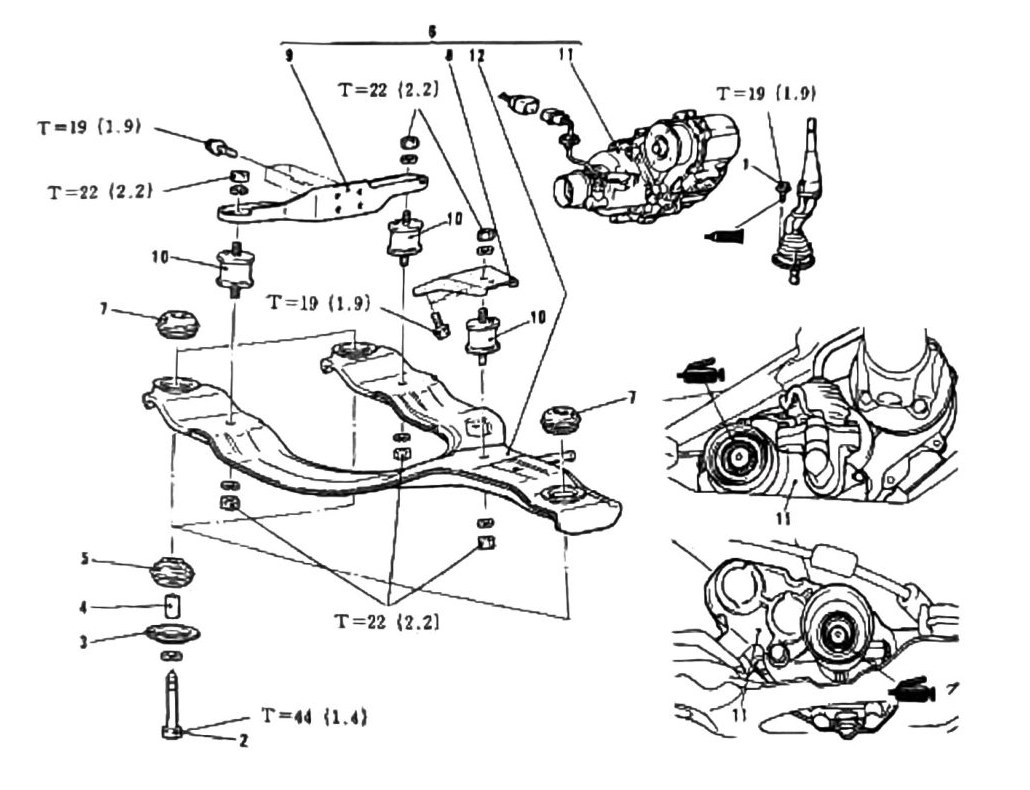
Torque
| Torque callout | N·m (kgf·m) |
|---|---|
| T=22 (16 ft-lb) | (2.2) |
| T=19 (168 in-lb) | (1.9) |
| T=19 (168 in-lb) | (1.9) |
| T=22 (16 ft-lb) | (2.2) |
| T=19 (168 in-lb) | (1.9) |
| T=22 (16 ft-lb) | (2.2) |
| T=44 (32 ft-lb) | (1.4) |
(verify printed p.175) — the last callout, transcribed by OCR as T=44 (1.4), is internally inconsistent: 44 N·m does not convert to 1.4 kgf·m (it should read roughly 4.5 kgf·m, matching the pattern used elsewhere in this chapter, e.g. T=44 (4.5) in Transmission Removal). This is very likely an OCR error on one side of the pair — possibly T=44 (4.5) or T=14 (1.4) — but the correct value is not confirmed. Do not use either guess without checking the printed diagram.