Rocker Arm & Camshaft — SOHC
SOHC only. The DOHC version of this system uses hydraulic lash adjusters and does not require manual valve lash adjustment — see 37-rocker-arm-camshaft-dohc.md.
Component removal order
- Breather hose
- PCV hose
- PCV valve
- PCV valve grommet
- Oil filler cap
- Rocker cover
- Rocker cover gasket
- Oil seal
- Oil seal
- Rocker arm shaft assembly
- Rocker arm shaft assembly
- Rocker shaft spring
- Rocker arm Type A
- Rocker arm Type B
- Rocker arm shaft
- Adjusting screw
- Rocker arm Type C
- Rocker arm shaft
- Adjusting screw
- Camshaft
Note: Oil all moving parts with 30W SAE oil before assembly.
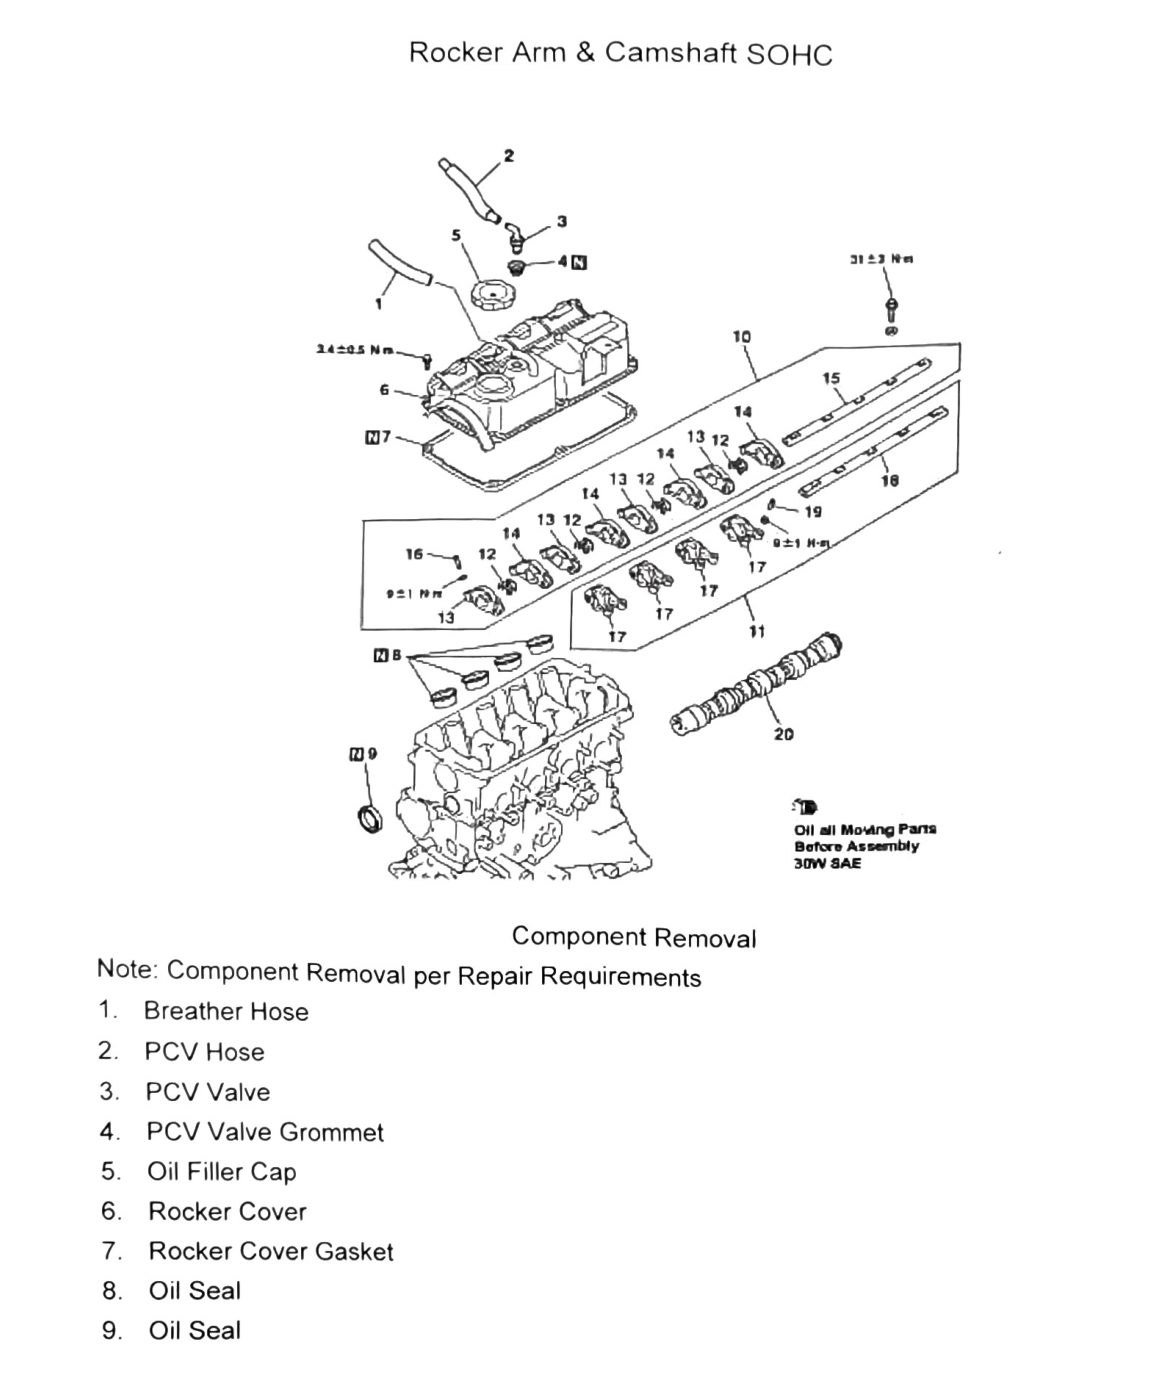
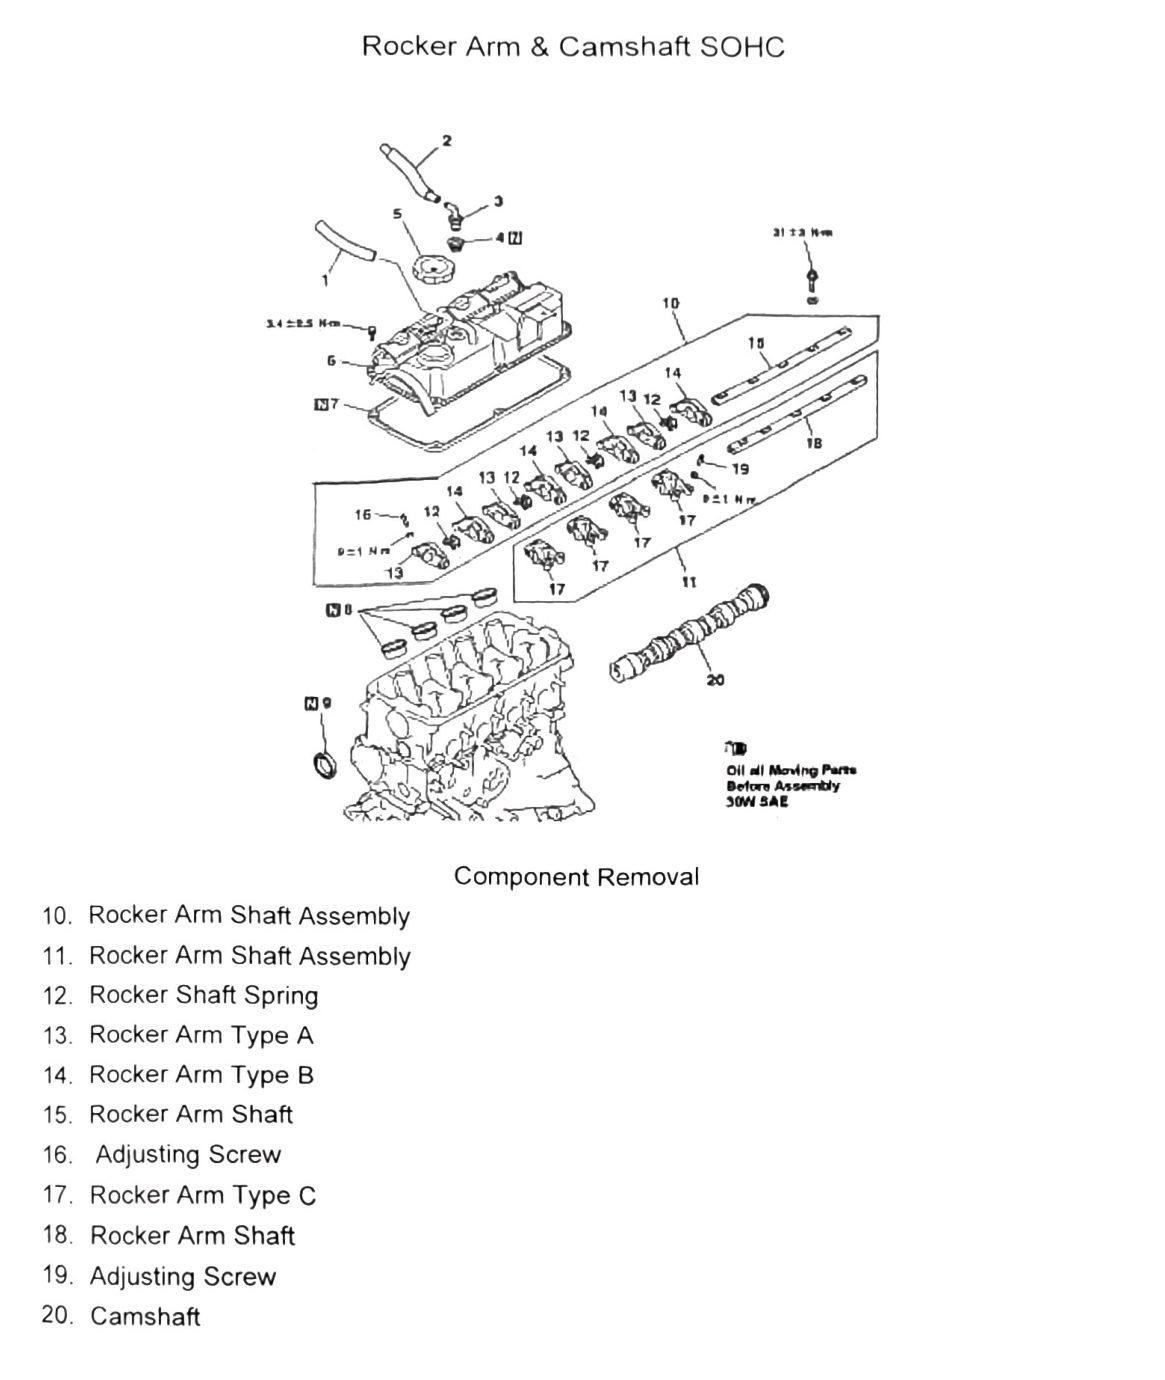
Torque values (as scanned)
Several torque callouts on the exploded-view diagrams (printed p.82-83) did not survive OCR cleanly enough to map to specific fasteners — recovered fragments include “14205 Nm,” “N7,” “921 Nm,” and “31±3” alongside a clean, unambiguous 9±1 Nm (80±9 in-lb) figure that the maintenance notes (below) confirm is the rocker arm shaft lock-nut torque.
(verify printed p.82-83) — confirm any additional cover/shaft-assembly bolt torques beyond the 9±1 Nm lock-nut spec; the diagram fragments could not be reliably assigned to a fastener.
Maintenance notes
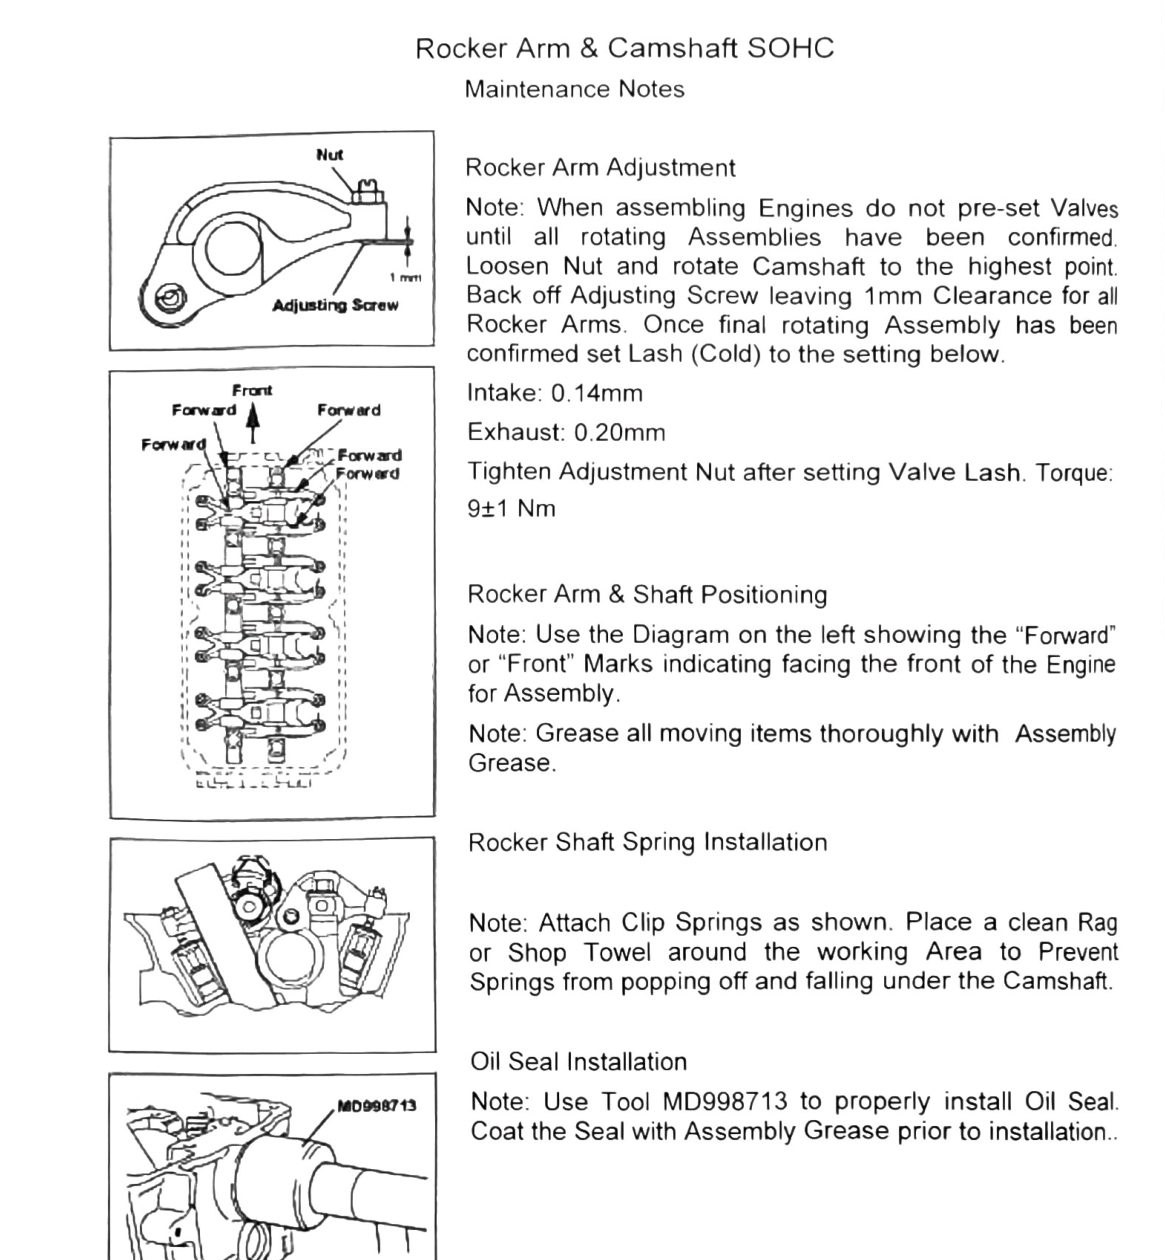
Valve lash adjustment
Note: When assembling engines, do not pre-set valves until all rotating assemblies have been confirmed. Loosen the nut and rotate the camshaft to the highest point. Back off the adjusting screw, leaving 1mm (0.039in) clearance for all rocker arms. Once the final rotating assembly has been confirmed, set lash (cold) to the setting below.
| Valve | Lash (cold) |
|---|---|
| Intake | 0.14mm (0.006in) |
| Exhaust | 0.20mm (0.008in) |
Tighten the adjustment nut after setting valve lash.
Torque: 9±1 Nm (80±9 in-lb)
Use the “Forward”/“Front” marks on the rocker arm & shaft assembly for correct positioning during assembly, and grease all moving items thoroughly with assembly grease.
Rocker shaft spring installation
Note: Attach clip springs as shown. Place a clean rag or shop towel around the working area to prevent springs from popping off and falling under the camshaft.
Oil seal installation
Use tool MD998713 to properly install the oil seal. Coat the seal with assembly grease prior to installation.
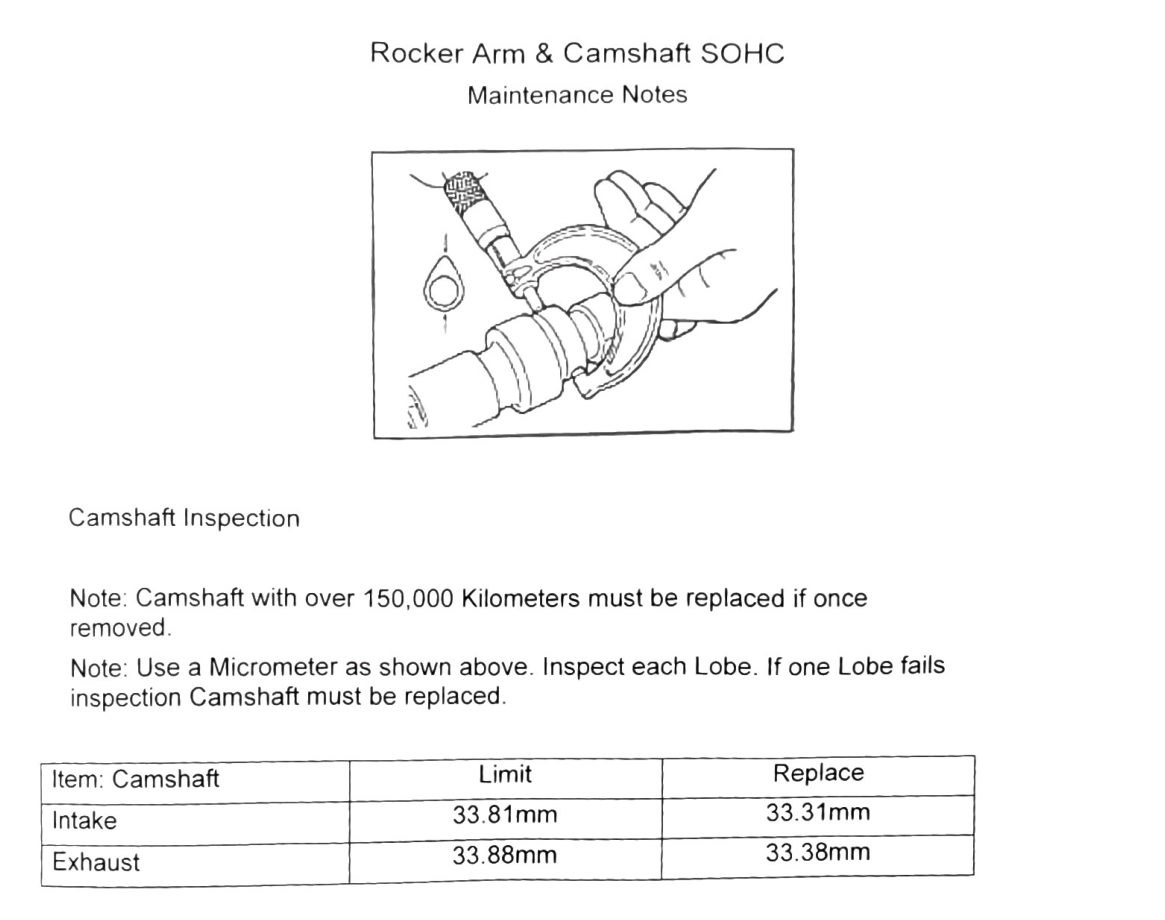
Camshaft inspection
Note: A camshaft with over 150,000 km (93,206mi) must be replaced if once removed.
Note: Use a micrometer as shown. Inspect each lobe. If one lobe fails inspection, the camshaft must be replaced.
Camshaft height (Intake/Exhaust, Limit/Replace): 33.81mm (1.331in) / 33.31mm (1.311in) / 33.88mm (1.334in) / 33.38mm (1.314in) — (verify printed p.85)
(verify printed p.85) — this restates the identical four numbers from the Chapter Engine Specifications table (see 34-engine-specifications.md) with the same ambiguous Intake/Exhaust/Limit/Replace pairing. Two independent scans of this table both lost the row/column structure the same way — do not guess which number belongs to which label without a clean re-scan.